Wind Damage Insurance Claims: A Contractor’s Complete Guide
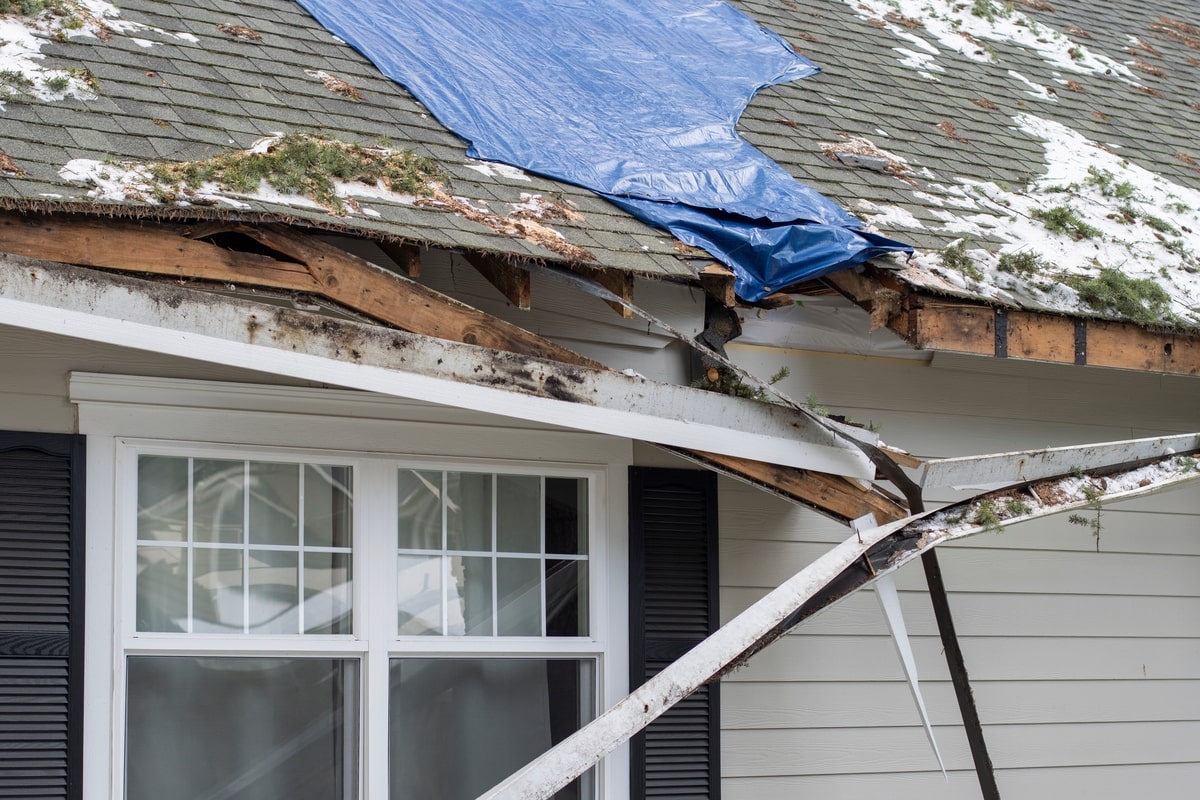
Table of Contents
- What Is a Wind Claim? (Full Breakdown for Contractors and Property Owners)
- Types of Wind Damage Contractors Should Document on Every Project
- Do Most Homeowners’ Insurance Policies Cover Wind Damage? (What Contractors Should Know)
- The Average Deductible for Wind Damage (And How to Prepare Homeowners for It)
- Can You File an Insurance Claim for Wind Damage?
-
What Contractors Need to Document for Wind Damage Claims
- 1. High-Resolution Photo Documentation (and the Exact Angles You Need)
- 2. Video Documentation of Wind Patterns and Movement
- 3. Drone Footage for Roof Systems and Property Mapping
- 4. Moisture Readings and Interior Documentation
- 5. Material-Specific Documentation (Age, Type, Availability)
- 6. Pre-Storm Condition Evidence
-
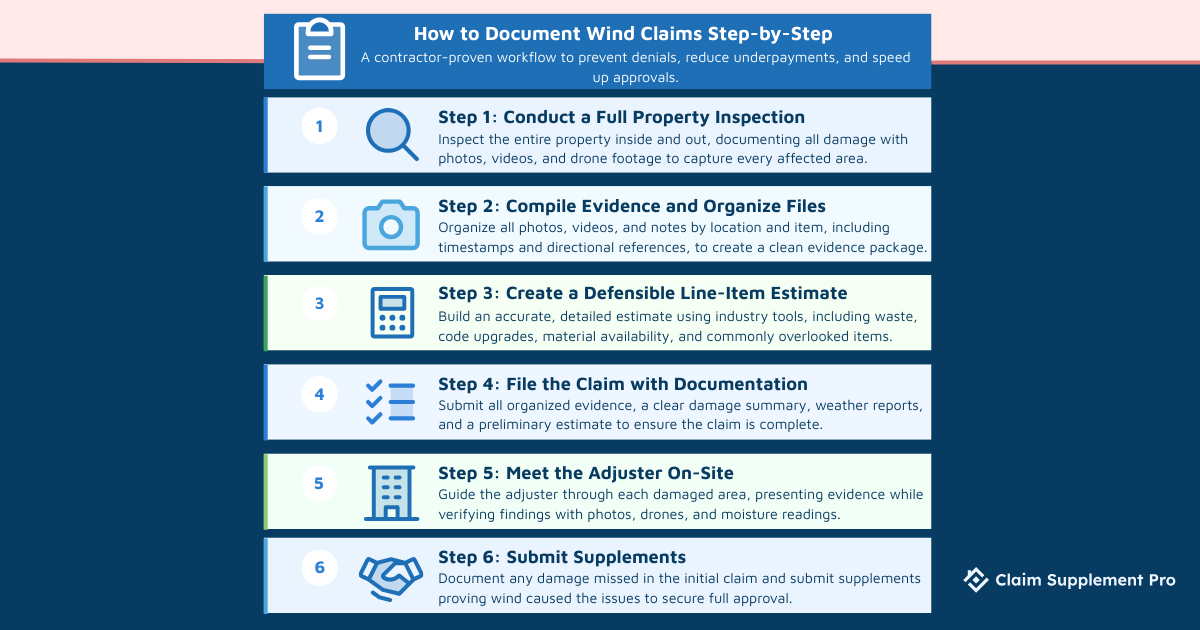
How to Document Wind Claims Step-by-Step (Contractor-Proven Process)
- Step 1: Conduct a Full Property Inspection
- Step 2: Compile Evidence and Organize Files
- Step 3: Create an Accurate, Line-Item Repair Estimate
- Step 4: File the Claim with Supporting Documentation
- Step 5: Meet the Adjuster On-Site (Important for Claim Success)
- Step 6: Submit Supplements for Missing or Underpaid Items
- Common Reasons Wind Damage Claims Are Denied or Underpaid (And How Contractors Can Prevent It)
- Wind Damage Claims for Commercial Buildings: Additional Documentation Needed
- When Contractors Should Bring in a Claim Supplement Expert
- Final Thoughts: Proper Documentation Gives Strength to Wind Damage Claims
Windstorms can leave a trail of damage: shingles lifted, siding weakened, gutters loosened–and these are only some of the problems that can be overlooked or misclassified. The only way to a fair insurance payout leads through thorough documentation and strategic claim handling.
In this guide, we walk you through wind damage claims from start to finish, highlighting common oversights and showing how careful supplementing can serve as your wind of change by ensuring every legitimate repair is accounted for.
Claim Supplement Pro partners with contractors to navigate inspections, estimates, and supplements, helping secure accurate, fully justified payouts. Both this guide and our services exist to help your projects stay on track and fully funded.
What Is a Wind Claim? (Full Breakdown for Contractors and Property Owners)
A wind damage insurance claim is filed when strong winds physically damage a property. This can include lifted shingles, damaged siding, loosened gutters, or even compromised fencing. Most homeowners’ and commercial property policies cover wind as a specific peril, though coverage can vary depending on whether the damage occurs during a “wind-only” event or as part of a larger storm that includes hail or rain.
Understanding the terminology used in your policy is a must, as most policies limit coverage for pre-existing damage, poorly maintained roofs, or other exceptions. Knowing what is included and where exclusions might apply sets your stage for accurate documentation and proper claim handling.
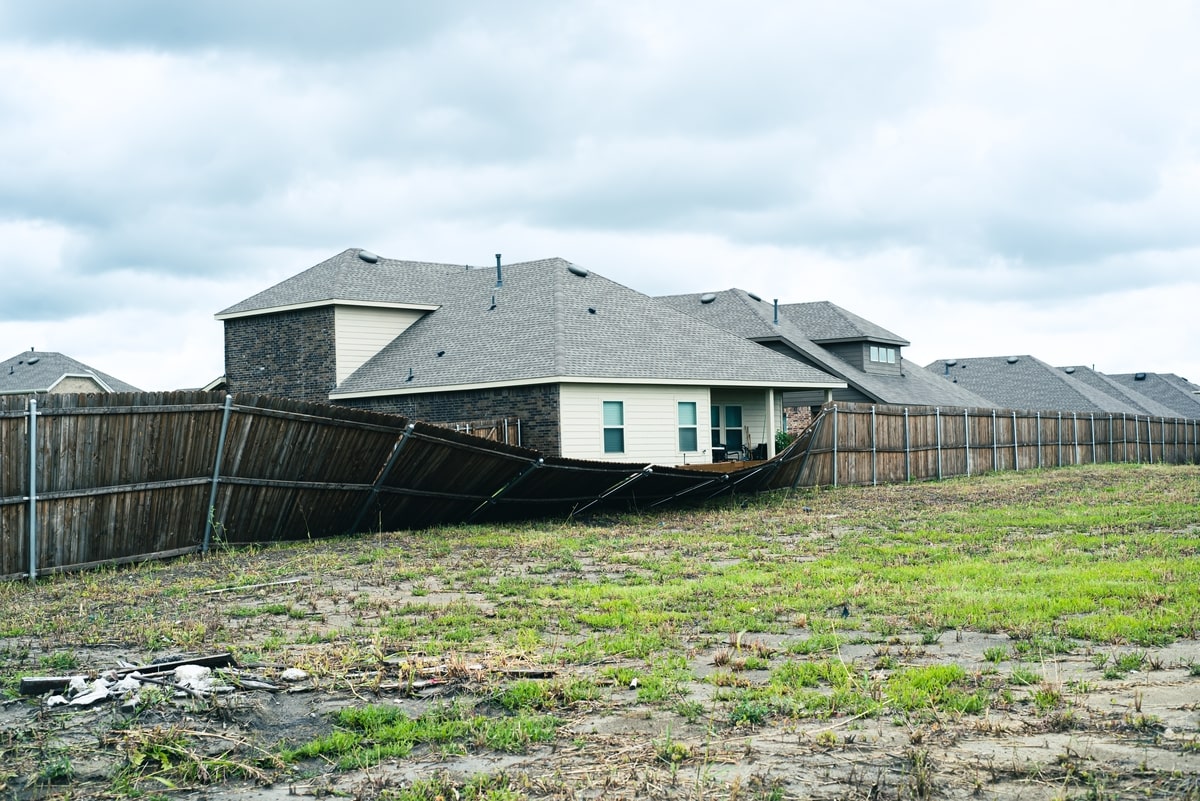
Types of Wind Damage Contractors Should Document on Every Project
To accurately support an insurance claim for wind damage, you need to carefully inspect and document the full scope of impairment. Key areas include:
- Roof system damage – Missing, cracked, or lifted shingles or tiles; damaged metal roofing; compromised membranes; loose fasteners.
- Soft metals – Gutters, downspouts, vents, and flashing that have been bent, torn, or displaced.
- Building envelope – Siding, stucco, trim, fascia, and soffits that have been loosened, cracked, or detached.
- Mechanical and exterior systems – HVAC units, antennas, solar panels, and other mounted equipment affected by wind.
- Interior damage – Water stains, wet insulation, or damage caused by wind-driven rain, where the wind first created a physical opening in the structure.
- Safety hazards – Exposed decking, loose boards, or any other structural elements that create a risk for occupants or workers.
- Collateral damage – Landscaping, fencing, sheds, or other exterior structures impacted by wind.
You’ll want to be documenting each of these areas thoroughly with photos, measurements, and notes for maximum claim accuracy so that no legitimate repair goes unrecorded.
Do Most Homeowners’ Insurance Policies Cover Wind Damage? (What Contractors Should Know)
Most standard homeowners’ policies, such as HO-3 forms, include coverage for wind damage, protecting the structure and often attached systems from storms. Coverage typically extends to roofing, siding, windows, and other exterior components damaged by wind.
However, there are important exceptions you should be aware of. Coastal regions often have special wind or hurricane deductibles, and some policies limit coverage for older roofs or deteriorated materials. Named storm deductibles may apply for hurricanes or severe wind events, requiring a separate calculation from standard deductibles.
Certain clauses, such as anti-concurrent causation provisions, can affect claims when wind damage occurs alongside other perils like flooding or hail. In these borderline situations, supplemental documentation can be essential for proving the main source of damage is covered and ensuring the claim is fairly evaluated.
The Average Deductible for Wind Damage (And How to Prepare Homeowners for It)
Wind damage deductibles vary across the country, but most homeowners can expect to pay anywhere from $500 to $2,500 for standard flat deductibles. In higher-risk regions, especially coastal states, policies often shift to percentage-based deductibles, typically 1–5% of the home’s insured value. For a $300,000 home, that means a wind deductible could range from $3,000 to $15,000, depending on the policy.
Understanding the difference between flat and percentage deductibles is crucial when setting expectations with customers. A homeowner with a $1,000 flat deductible will approach the project far differently than one facing a 3% named-storm deductible. These numbers directly influence how clients interpret your bid, their willingness to proceed with repairs, and how quickly they authorize work.
You should always be transparent about how deductibles affect out-of-pocket expenses. It’s equally important to remind homeowners that deductibles cannot be waived, covered, or absorbed by the contractor. Doing so is illegal in most states and can jeopardize both the claim and your business. Instead, help homeowners understand the policy details, document the full scope of wind damage, and provide accurate estimates so they feel confident about the financial side of their claim.
Can You File an Insurance Claim for Wind Damage?
Hopefully it’s clear by now that the answer to this question is yes, but it’s important to know when it makes sense to file one and when it may not be worth the deductible.
Filing is appropriate in situations where the wind has caused clear physical damage. Claims are also common after widespread wind events, especially when neighboring homes show similar patterns of damage. Interior issues like water intrusion clearly caused by wind creating an opening in the structure are also strong indicators that a claim is justified.
On the other hand, not every scuff or dent warrants a claim. Minor cosmetic issues that fall below the homeowner’s deductible usually aren’t worth filing, as they won’t result in a payout and may count toward the policyholder’s claim history. As a contractor, you should help homeowners avoid unnecessary filings by identifying whether the damage is substantial enough to justify a claim.
We’ll walk you through what has been shown to be a smart workflow before filing a wind damage claim:
- A thorough inspection of the roof, exterior, attic, and surrounding areas.
- Clear evidence, including photos, slope-by-slope documentation, and notes on wind patterns.
- A well-defined damage scope that explains what was affected and why.
- A preliminary repair estimate, ensuring the homeowner understands whether the damages realistically exceed the deductible.
With the right prep work, homeowners can file confidently, and you can guide them toward the best financial and structural outcome.
What Contractors Need to Document for Wind Damage Claims
Detailed, precise documentation is the foundation of a strong wind damage claim. We can’t stress this enough because most underpaid or denied claims aren’t the result of bad intent but stem from incomplete evidence. When damage isn’t clearly shown, described, or measured, adjusters have limited information to work with, which can lead to a smaller scope or overlooked items. That’s why contractors who consistently provide detailed, organized documentation see faster approvals, fewer supplement delays, and more accurate payouts.
Think of the following list as the gold standard documentation checklist, as it describes the process that ensures every piece of wind-related damage is verified and easy for an adjuster to understand.
1. High-Resolution Photo Documentation (and the Exact Angles You Need)
Photos are more than just proof; they’re communication. Clear, high-quality images allow adjusters to understand the extent, direction, and nature of the wind damage without ambiguity.
Do your best to capture:
- Every slope and every elevation
Photograph the roof methodically, slope by slope, with wide, mid-range, and close-up shots. Exterior elevations should show siding, soft metals, trim, soffits, and fascia.
- Directional indicators (north/south/east/west)
Wind damage is often directional, so each slope photo should note orientation. This helps establish wind patterns and supports your scope of loss.
- Shingle creases at a 90-degree angle
Creased shingles can be easy to dispute if they’re photographed from poor angles. Shoot at a true 90 degrees so the crease is clearly visible and undeniable.
- Missing shingles: close-up and wide view
Close-ups show the damage; wide shots show where it occurred and how it impacts the full roofing system. Both are necessary for a complete evaluation.
- Collateral damage
Document soft metals, gutters, downspouts, vents, flashing, ridge caps, fences, sheds, patio furniture, and landscaping that show wind impact. These often support wind direction and overall storm severity.
- Proper lighting and clarity
Avoid shadows, glare, dusk, or rainy conditions. Use the roof’s natural slope to your advantage by positioning yourself so that creases and lifted tabs are fully visible.
2. Video Documentation of Wind Patterns and Movement
Video evidence adds immediate context that still photos can’t capture. Movement, sound, and real-time conditions help adjusters understand the severity of wind impact and why certain repairs or replacements are truly necessary.
You should record:
- Loose shingles lifting during inspection
Wind-lift videos are some of the strongest proof in a wind claim. Showing shingles flexing, lifting, or failing to seal demonstrates functional damage that may not be visible in photos alone.
- Noises or instability indicating compromised structures
Rattling fascia, vibrating vents, unstable gutters, or loose siding can reveal structural concerns caused by wind pressure. Video makes these issues unmistakable.
- Wind-driven water entry at damaged points
If wind first caused a physical opening, such as blowing off flashing, siding, or shingles, record how water is entering at that exact opening. Videos showing the connection between structural compromise and water intrusion help clarify coverage and differentiate wind-driven damage from unrelated leaks.
3. Drone Footage for Roof Systems and Property Mapping
Drone footage has become one of the most effective modern tools for documenting wind damage, especially on steep-slope roofs, multi-story properties, and structures where safe access is limited. High-resolution aerial imagery provides adjusters with a visual narrative and a level of clarity and context that ground-based photos simply can’t match.
You could use drone footage to your advantage to:
- Safely inspect steep-slope and multi-story buildings
Drones make it possible to capture detailed evidence without risking crew safety or compromising inspection quality.
- Show the entire roof system to demonstrate uniformity of damage
Uniform patterns such as widespread creasing, missing shingles across slopes, or consistent granule loss are key indicators supporting full roof replacement instead of partial repairs.
- Capture debris and impact patterns that reveal wind direction
Leaves, branches, displaced shingles, and scattered materials often tell the story of how the wind moved across the property. Adjusters rely on this type of evidence to understand causation.
- Provide aerial context for the full property
Drone mapping can show collateral damage, surrounding structures, and environmental factors, giving adjusters a complete, accurate overview of the loss.
4. Moisture Readings and Interior Documentation
Interior damage is one of the most frequently overlooked components of a wind claim, especially when the focus stays on exterior roofing and siding issues. That’s why moisture readings and interior inspections are essential for proving wind-driven water intrusion when a physical opening in the structure is present.
Contractors should perform and document:
- Moisture meter readings to identify hidden intrusion
Use both pin and pinless meters to confirm elevated moisture levels behind walls, around roof penetrations, near chimneys, and along window or door frames. These readings create objective, quantifiable evidence that adjusters rely on when evaluating whether wind opened the structure and allowed water to enter.
- Insulation saturation inside attics or wall cavities
Even when interior drywall looks intact, insulation may be soaked. Photographing insulation removal, bagged wet materials, and moisture readings helps validate the need for replacement, not just repairs.
- Ceilings, walls, and window frames
Document any bubbling paint, staining, sagging drywall, or swollen trim. Capture both close-ups and wider context shots to show the origin and spread of the intrusion.
Why this matters:
Interior water intrusion tied to wind damage is commonly under-scoped because it isn’t always visible during the initial inspection. Without moisture readings and interior documentation, adjusters may assume the damage is unrelated or pre-existing. Clear, methodical documentation ensures these line items are not missed or denied.
5. Material-Specific Documentation (Age, Type, Availability)
Material documentation can make or break a wind claim, especially when determining whether repairs are feasible or a full replacement is warranted. Contractors should capture detailed information about the roofing system and related materials so adjusters can accurately assess what is repairable and what isn’t.
- Identify shingle type, manufacturer, and product line
Photograph the shingle profile, markings, and packaging (when available). Pair this with notes on age, installation method, and known weathering. This helps confirm whether matching materials are still available in today’s market.
- Confirm whether shingles are discontinued or limited in availability
When a product is no longer manufactured or is only available through limited suppliers, document this with supplier statements, inventory screenshots, or written confirmation from distributors. This evidence supports replacement when repairs would create a mismatched and non-uniform roof system.
- Document brittleness (when appropriate)
A brittle test should only be used in specific scenarios:
– If insurance has already approved repairs on part of the roof, and you need to demonstrate why those repairs aren’t feasible.
– If you are trying to justify a full replacement instead of a partial repair that would cause further damage.
Record videos or photos showing shingle cracking or breaking during careful manipulation. This helps show that repairs would worsen the condition and are not viable.
- Link brittleness and material availability to scope decisions
Explain how brittle or discontinued shingles make spot repairs impractical. When combined with supplier documentation and age data, these findings build a strong justification for full-roof replacement.
6. Pre-Storm Condition Evidence
Pre-storm documentation is one of the most powerful tools for validating a wind damage claim. When you can show the roof or exterior was in good condition before the storm, it becomes far easier to demonstrate that the wind event, not wear and tear, caused the current damage.
- Use photos from previous roof inspections
Any images taken before the storm, whether from annual maintenance checks, gutter cleanings, or previous leak evaluations, can establish what was intact beforehand. Even simple pre-storm real estate photos or drone marketing shots can serve as supporting evidence.
- Secure credible weather reports to prove the wind event
Weather data is essential for tying the damage to a specific date of loss. Contractors should pull:
– NOAA storm event reports
– Local wind speed records from regional weather stations
– Storm path or radar imagery demonstrating wind direction and intensity
This documentation helps verify that conditions were strong enough to cause the type of damage observed on the property.
- Combine pre-storm photos with weather data for maximum clarity
When before-and-after photos are paired with validated wind reports, adjusters can quickly connect the dots. This reduces questions about pre-existing conditions and supports approval of the appropriate scope.
How to Document Wind Claims Step-by-Step (Contractor-Proven Process)
You can only prevent denials and underpayments by following a clear workflow; the same workflow that lets you also streamline supplements and improve approval speed.
Step 1: Conduct a Full Property Inspection
Start with a complete exterior and interior assessment.
Exterior checklist:
- Roof slopes, ridges, valleys, flashing, soft metals
- Siding, trim, fascia, gutters, downspouts
- HVAC units, solar panels, fencing, sheds
Interior checklist:
- Ceilings, walls, windows, insulation
- Wind-driven rain points only if caused by a wind-created opening
Use photos, videos, and drone footage to capture all visible and directional damage.
Step 2: Compile Evidence and Organize Files
Strong claims are organized claims.
- Label each photo by slope/elevation and item.
- Create folders for inspection → estimate → supplement stages.
- Include timestamps and directional references.
A clean evidence package reduces back-and-forth with adjusters.
Step 3: Create an Accurate, Line-Item Repair Estimate
Use industry-standard estimating tools such as Xactimate or Symbility to build a defensible scope.
Include:
- Precise waste calculations
- Applicable code upgrade requirements (IRC/IBC)
- Market availability notes for materials
- Any items insurers commonly overlook
You can always partner with professionals who provide estimating services when estimates require advanced line-item accuracy instead of stressing about precision.
Step 4: File the Claim with Supporting Documentation
When helping homeowners file, remember to include:
- Inspection photos and videos
- A clear damage summary
- Weather reports showing wind activity
- A preliminary estimate (if appropriate)
Avoid filing with unclear images, missing angles, or unlabeled files, as these slow down the entire claim.
Step 5: Meet the Adjuster On-Site (Important for Claim Success)
Contractor presence makes a measurable difference.
- Walk adjusters through each damaged area
- Present evidence calmly and professionally
- Use photos, drone shots, and moisture readings to correct any missed findings
Stick to facts and keep in mind that collaboration works better than confrontation.
Step 6: Submit Supplements for Missing or Underpaid Items
Wind claims often miss damage that wasn’t obvious during the first inspection, especially when the property has multiple elevations or slopes.
Common supplement items when wind actually caused the damage include:
- Lifted or creased shingles
- Damaged ridge components
- Bent flashing or soft metals
- Downed gutters or detached trim
- Broken or displaced exterior components
Of course, none of these items will be approved if your roofing supplements don’t prove that it was the wind that damaged them.
Common Reasons Wind Damage Claims Are Denied or Underpaid (And How Contractors Can Prevent It)
Wind claims rarely fall apart because the damage isn’t real, but often do because the documentation doesn’t fully support it. Understanding the most common denial and underpayment triggers helps contractors build stronger cases from the start.
1. Insufficient Documentation
Missing angles, unclear photos, or a lack of directional context make it difficult for carriers to validate wind impact.
Capture high-resolution photos, drone shots, and interior moisture readings; label everything clearly.
2. Misclassified Damage (“Wear and Tear”)
Wind-lifted shingles, creases, or soft metal impacts are often mistaken for aging materials.
Provide close-up photos and clear pre-storm condition comparisons.
3. No Proof of Storm Date
Without verifiable weather data, the claim is likely to be questioned or delayed.
Attach NOAA or local wind reports and tie the damage to a specific storm event from the start.
4. Incorrect Roof Measurements
Measurements that don’t match the insurer’s data can trigger scope disputes or partial approvals.
Use digital measurement tools to validate roof size and pitch.
5. Incomplete Scope of Loss
Leaving out components results in reduced payouts.
Build a consistent inspection workflow that covers the entire property.
6. Missing Code-Required Line Items
Required items such as underlayment upgrades, ventilation, or flashing may be excluded if not documented.
Include relevant IRC/IBC citations and local code requirements in your estimate.
7. Poor Communication Throughout the Claim
Misunderstandings often lead to delays, revisits, or reduced approvals.
Present findings professionally, stay responsive, and be the one who guides homeowners through the process.
In case you’ve already run into denial, review our guide on how to turn denied insurance claims into approval.
Wind Damage Claims for Commercial Buildings: Additional Documentation Needed
Commercial roofs demand more detailed evidence than residential claims because of their membrane systems, mechanical equipment, and perimeter assemblies. Missing even one component can lead to delays or underpayment of commercial roof insurance claims.
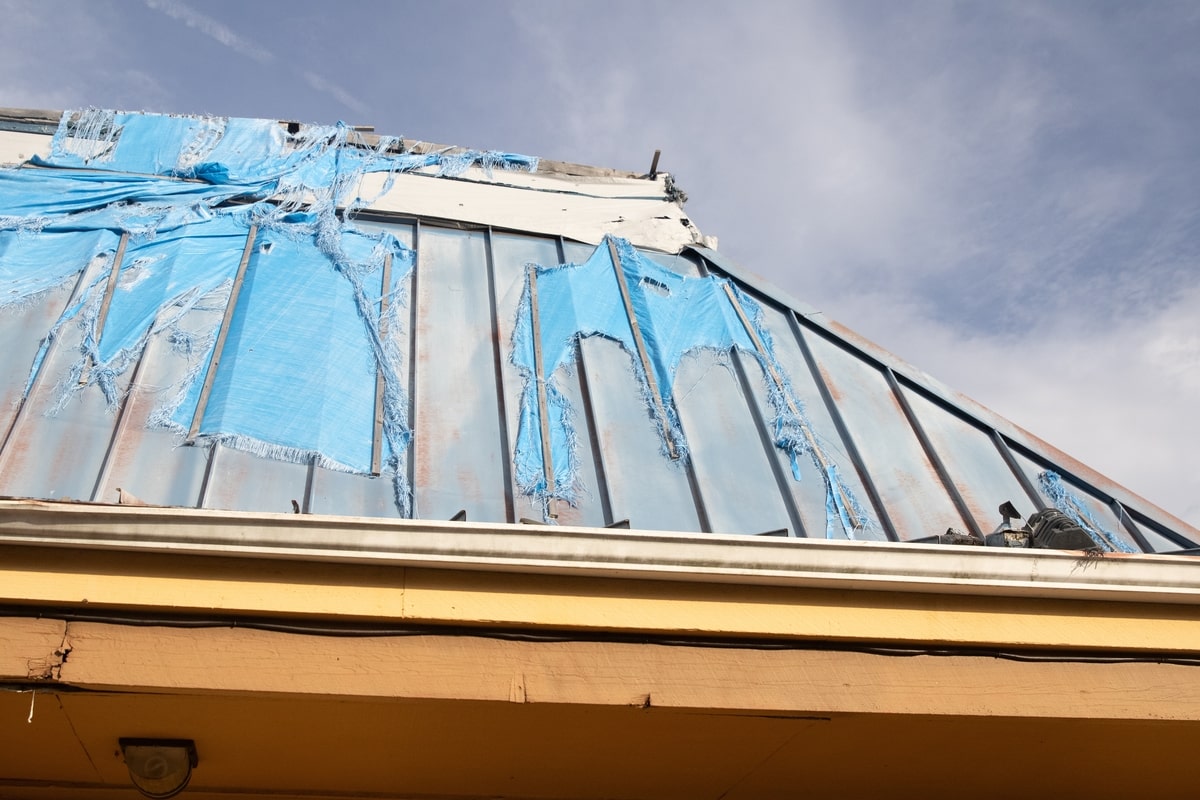
Flat Roof Systems (TPO, EPDM, PVC)
Document membrane type, thickness, installation method, and all areas showing uplift, punctures, or seam failure. Include infrared scans or core samples when possible.
Membrane Uplift Testing
Uplift or pull tests help verify compromised attachment that isn’t always visible. Third-party results give strong support for storm-related failure.
Perimeter Flashing & Edge Metal
Capture displaced edge metal, fastener pull-through, corner failures, and sealant issues. These areas take the most wind pressure and are key in commercial claims.
HVAC Curbs & Rooftop Units
Record shifted curbs, detached flashing, and any damage to ductwork or panels. Even minor movement can break the water seal and justify repairs or replacement.
Skylights & Rooftop Equipment
Document cracked domes, displaced sealant, bent frames, fastener movement, and interior moisture staining tied to wind intrusion.
When Contractors Should Bring in a Claim Supplement Expert
There are instances in which having a supplement expert for wind damage claims is the difference between approval and a severely underpaid scope. Let’s sum those up:
- When insurers dispute wind direction or storm impact
If the carrier argues the wind couldn’t have caused the observed damage, a supplement expert can tie directional indicators, debris patterns, and weather data together into a defensible narrative.
- When damage is borderline (functional vs. cosmetic)
Experts help prove functional impairment so claims aren’t dismissed as “wear and tear.”
- When adjusters miss key roofing components
If items like flashing, ventilation, underlayment, edge metal, or accessory components are overlooked, an expert ensures everything is documented and justified.
- Complex commercial properties
Large roofs, membrane systems, HVAC curbs, and multiple elevations often require advanced documentation and code-backed supplements.
- Large losses with multiple structures
When the claim involves several buildings or extensive storm paths, experts organize evidence, write detailed estimates, and prevent under-scoping.
Final Thoughts: Proper Documentation Gives Strength to Wind Damage Claims
Wind claims aren’t won by guesswork; they’re won by clear evidence, organized files, and estimates that leave no room for interpretation. When contractors document thoroughly, support homeowners through the claim process, and lean on expert supplementing when needed, wind losses are settled faster, more accurately, and with far fewer disputes. Those are verified facts.
Another fact is that your role goes beyond repairing a roof; you’re protecting families, properties, and long-term value. But you don’t have to do any of that alone.
If you need help with supplementing, estimating, or building airtight documentation packages that will allow you to fulfill your role, Claim Supplement Pro is here to support you every step of the way.