The Complete Water Damage Insurance Claim Process: Step-by-Step Guide for Contractors and Homeowners
Table of Contents
- Understanding How Water Damage Insurance Claims Work
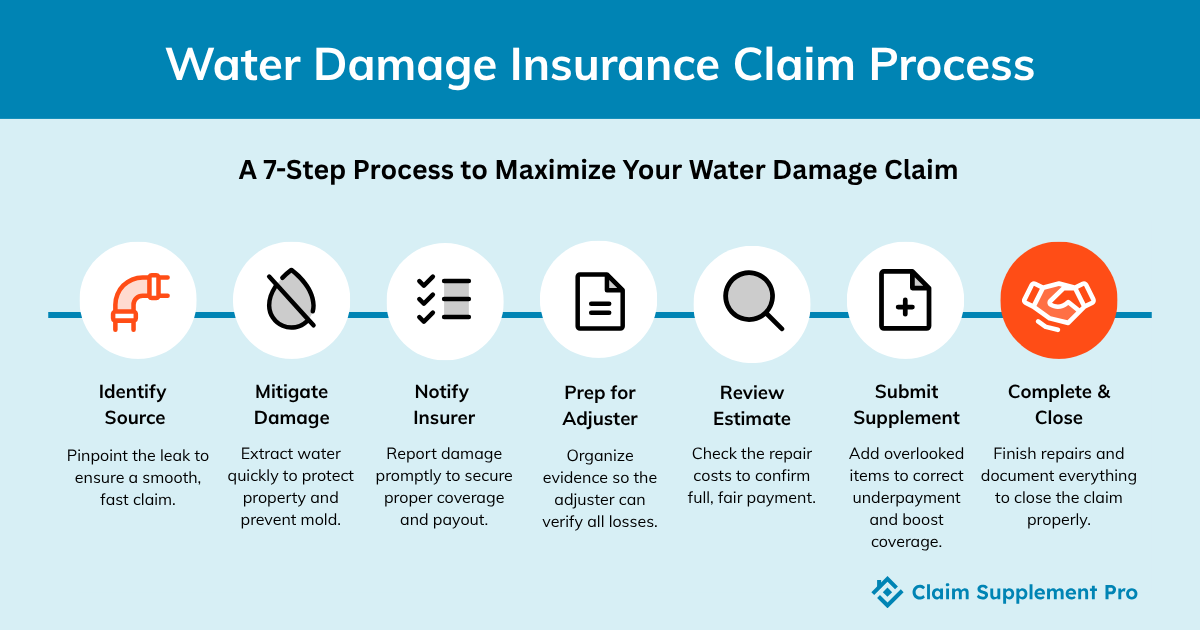
- Step 1 – Identify and Document the Source of Water Damage
- Step 2 – Start the Water Damage Mitigation Process Immediately
- Step 3 – Notify Your Insurance Provider and File the Claim
- Step 4 – Prepare for the Adjuster’s Inspection
- Step 5 – Review the Insurance Estimate
- Step 6 – Submit a Supplement if the Claim Is Underpaid
- Step 7 – Repairs, Payout, and Claim Closure
- Average Payouts and Coverage Limits for Water Damage Claims
- What Mitigation Specialists and Homeowners Can Do to Prevent Future Water Damage
- When Water Damage Turns into a Flood Claim: Understanding the Difference
- How Claim Supplement Pro Helps Streamline the Water Damage Claim Process
- Turning the Tide on Water Damage Claims
Water is a compound essential to life. It keeps our planet green and our bodies hydrated. But one of the few times you’ll struggle to appreciate it is when it becomes the root cause of property damage.
For both homeowners and contractors, dealing with water damage can be overwhelming, especially when it comes to navigating the water damage insurance claim process. Many claims end up underpaid or denied simply because of incomplete documentation, unclear communication, or missed details in the initial estimate.
That’s why Claim Supplement Pro helps contractors and property owners understand how to process a water damage claim correctly, all the way from identifying damage and compiling evidence to supplementing underpaid claims for fair compensation.
In this guide, we’ll walk you through the entire process and share practical insights to help you avoid costly errors and headaches along the way. So, before another drop of confusion spills over, grab your glass of water and read on.
Understanding How Water Damage Insurance Claims Work
A water damage insurance claim is a formal request to your insurance company to cover the cost of repairs caused by sudden or accidental water-related incidents. These include stuff like a burst pipe, a leaking appliance, or an overflowing washing machine. Unlike fire or roof damage claims, water damage claims are often more complex because the source, timing, and extent of moisture intrusion all determine whether the loss is covered or your water damage claim gets denied.
Generally, insurance excludes gradual issues like long-term leaks, poor maintenance, or flooding from external sources. Flood-related losses are usually covered under a separate flood insurance policy, either through FEMA’s National Flood Insurance Program or a private flood insurance provider.
When a claim is filed, an adjuster evaluates the damage, compares it to your policy limits, and subtracts the deductible before issuing a payout. However, these estimates may miss hidden or secondary damages that appear once mitigation begins. And this is exactly one of the main reasons supplements become necessary later on.
Step 1 – Identify and Document the Source of Water Damage
You always want to start the insurance claim process for water damage by locating the source and creating a clear record of what happened. This single step affects coverage, the speed of your claim, and whether supplements will be necessary.
How to Properly Identify the Source
Before anything else, pinpointing where the water is coming from determines whether the loss will even qualify for coverage. Common causes include burst or frozen pipes, roof or window leaks, appliance malfunctions, or plumbing backups.
Contractors play a key role here as insurance companies need to see that the source has been verified and stopped before approving restoration work. The faster and more precisely the cause is identified, the smoother the claim process becomes.
Why Detailed Documentation Is Critical
Once the source is under control, thorough documentation becomes your strongest evidence in the water damage claim process. Capture clear, time-stamped photos and videos of all affected areas, including the source of the leak, visible damage, and each phase of mitigation. Insurers often reduce or deny payouts when documentation is missing or inconsistent, even if the damage is legitimate.
Modern tools can help contractors present more credible evidence. Moisture mapping, 3D imaging, and 360° camera views are game-changers in recording the full extent of the damage with precision, ensuring nothing gets overlooked in the insurer’s assessment.
Step 2 – Start the Water Damage Mitigation Process Immediately
Even once the source of water is identified and stopped, every minute counts. Acting quickly can make the difference between a manageable restoration and a full structural overhaul. More importantly, most insurance policies require immediate mitigation to prevent secondary damage, which means delays can hurt not only the property but also the claim itself.
What Is Water Mitigation?
The water damage mitigation process is the first step toward recovery. It focuses on controlling and minimizing damage rather than rebuilding. This includes extracting standing water, drying affected materials, and preventing mold growth or warping.
Restoration, on the other hand, begins once the property is dry and ready for repair or replacement work. Swift mitigation protects both the structure and your eligibility for full coverage in the insurance claim process for water damage.
Common Mistakes Mitigation Technicians Should Avoid
Even as an experienced mitigation specialist, you can easily become a victim of costly errors during mitigation. Some of the most common include:
- Failing to maintain complete drying logs
- Forgetting to photograph mitigation equipment in use.
- Overlooking hidden moisture trapped behind drywall, under flooring, or inside insulation.
Role of Mitigation Specialists in Successful Mitigation Claims
Restoration professionals play a crucial part for mitigation work to be properly documented and reimbursed. Detailed line itemization, accurate moisture readings, and clear scope creation make future billing and supplementing far easier. Transparent and precise mitigation documentation is what clears the path to a fully covered claim.
Step 3 – Notify Your Insurance Provider and File the Claim
Once mitigation is underway and the damage is under control, the next step is to formally open your insurance claim. This is where organization and clarity matter most, since every missing photo, date, or description can slow down the process or lead to underpayment later.
Restoration contractors often play a key role at this stage by helping homeowners file claims accurately and provide the right supporting evidence from the get-go.
How to File a Water Damage Claim Correctly
The filing process typically begins with reviewing your insurance policy to understand coverage limits and exclusions. Then, contact your insurance provider to report the incident and open a claim. You’ll receive a claim number and be assigned an adjuster who will handle your case.
Your initial claim submission must include as much detail as possible: dates of loss, photos, and damage descriptions. Incomplete or vague information often leads to processing delays or partial payouts. The file should include all necessary documentation to set a strong foundation for the claim review.
What You Should (and Shouldn’t) Say to the Insurance Company
When communicating with your insurance provider, stick to factual, observable details. For example, say: “We are mitigating to address current damage.”
What NOT to say when making an insurance claim is maybe even more important, as you have to be careful to avoid any speculative statements. One big example could be implying–when you don’t know for sure–that the water damage was due to long-term leakage. Phrases like that may trigger a denial for pre-existing or excluded conditions.
A good rule of thumb is: describe what happened, not what you think happened. Keep the conversation objective and evidence-based, and let your photos, reports, and professional documentation do the explaining.
Step 4 – Prepare for the Adjuster’s Inspection
Once the claim is filed, it’s time for the on-site inspection—the stage that can make or break the outcome of your water damage insurance claim process. The adjuster’s visit determines what’s officially recognized as covered damage and how much the insurer will pay.
For both homeowners and contractors, preparation is everything. Having clear documentation, a clean site, and solid communication can make the difference between a fair settlement and an underpaid claim.
What Adjusters Look For
During the inspection, the adjuster assesses the cause of water damage, the extent of the impact, and the completeness of your documentation. They’ll typically review visible damage, check moisture levels, and compare their findings with the initial claim details.
Mitigation specialists’ key role here is to ensure every affected material (flooring, drywall, insulation, and even structural components) is properly examined and documented. The more transparent and detailed your on-site evidence, the stronger your case will be for full coverage.
Tips for Restoration Professionals During the Inspection
To make the most of the inspection:
- Be present and ready with supporting evidence, such as moisture readings, drying logs, and before-and-after photos.
- Provide itemized scopes that reflect the full mitigation and restoration effort.
- Communicate professionally and factually. The goal isn’t to challenge the adjuster but to collaborate in establishing the full scope of legitimate damage.
Common Underpayment Issues
Even with clear evidence, underpayment can occur. Insurers sometimes undervalue mitigation line items such as equipment rental, labor hours, containment materials, or disposal costs. These details might seem minor individually, but can collectively represent thousands of dollars in unreimbursed expenses.
Thorough documentation and experienced supplement review after the inspection help ensure those overlooked costs are identified and recovered.
Step 5 – Review the Insurance Estimate
Once the adjuster’s inspection is complete, the next critical step is reviewing the insurance estimate. This document forms the foundation of what the insurer is willing to pay, so understanding every line item and comparing it to the actual repair scope is essential if you want to avoid underpayment.
How to Read and Compare the Estimate
Carefully review each line item, paying attention to quantities, material types, and labor costs. Compare these details with actual job costs to spot any discrepancies.
Commonly missed categories include baseboard removal, equipment rental days, material disposal, and minor but necessary repairs.
Contractors can leverage professional tools like Xactimate or our estimating services to ensure the estimate aligns with the real scope of work
Why Estimates Are Often Incomplete
Insurance adjusters frequently rely on generic pricing databases that may underrepresent true repair costs. They may also overlook hidden damage or necessary code upgrades. That’s why your vital role lies in verifying that every line item reflects fair market value and the actual work required to restore the property correctly.
Step 6 – Submit a Supplement if the Claim Is Underpaid
Even with careful documentation and a thorough adjuster inspection, insurance estimates can sometimes come up short. Submitting a supplement ensures that all legitimate costs—whether overlooked or discovered during the mitigation process—are accounted for, helping you secure full payment for necessary repairs.
What Is a Supplement and Why It Matters
A supplement is an additional request submitted to the insurance company to correct underpayment or include omitted line items.
Claim Supplement Pro helps you identify missing elements, prepare detailed supporting documentation, and submit the supplement so that your claim reflects the actual scope of work. Learn more about what a claim supplement involves and how it works.
When to Submit a Supplement
Supplements should be submitted promptly after receiving the initial insurance estimate or once mitigation and restoration work reveal additional damage. Acting quickly helps avoid delays or closures in the claims process, keeping the insurance claim process for water damage on track.
Common Supplementable Line Items in Water Damage Claims
- Drying equipment runtime
- Containment setup
- Cleaning and deodorization
Get professional guidance on water mitigation and flood insurance claim supplements to set the seal that nothing is missed during submission.
Step 7 – Repairs, Payout, and Claim Closure
Once the insurance company approves the estimate and any supplements, the focus shifts to completing repairs and securing the final payout. Proper coordination between mitigation professionals and homeowners ensures that all covered damages are addressed and documented before the claim is closed.
Keeping the Claim Open Until Completion
It’s essential to maintain accurate records of all repair work, change orders, and additional discoveries. Any scope changes or supplements should be submitted before the claim is closed to guarantee every legitimate cost is covered. Only in this way can the water damage insurance claim process reach a fair and complete resolution.
Average Payouts and Coverage Limits for Water Damage Claims
A number is sometimes worth a thousand words, as numbers don’t lie. And when it comes to water damage, they sure do tell a compelling story. According to the Insurance Information Institute reports, water damage and freezing accounted for over 22% of homeowners’ damage claims between 2019 and 2023, with about one in 67 insured homes experiencing a property damage claim caused by water damage or freezing each year.
Meanwhile, industry data show the average insurance payout for water damage is $13,954, highlighting that water damage is a common and devastating problem for homeowners in the U.S.
Typical Payout Ranges
- Minor water incidents (e.g., small pipe leaks, limited drywall damage) often fall in the $2,500–$7,500 range for smaller jobs.
- Major water events (extensive structural drying, hidden damage, mold remediation) commonly reach $10,000 or more, and sometimes far higher when full replacement or major system repairs are required.
On larger or complex jobs, payouts can easily surpass the average if the documentation supports it, but keep in mind that lack of coverage, hidden damage, or policy limitations all reduce the payout.
Factors That Influence How Much You Get
- Coverage type & policy limits – Replacement cost vs. actual cash value, capped sub-limits for water damage.
- Source of damage – Covered perils like burst pipes tend to qualify, whereas gradual leaks or flooding often do not.
- Documentation quality – Thorough documentation enables justifying supplemental costs, leading to higher recovery.
- Claim process strategy – Submitting timely supplements for hidden damage or code upgrades can make the difference between underpaid and fully funded.
What Mitigation Specialists and Homeowners Can Do to Prevent Future Water Damage
Prevention is always cheaper and far less stressful than restoration. Regular maintenance and proactive care can significantly reduce the likelihood of water-related losses and make any future insurance claims easier to process and approve.
For homeowners, this means keeping an eye on plumbing connections, insulating pipes during colder months, cleaning gutters, and installing smart leak sensors that detect moisture early.
Being diligent about maintenance doesn’t just protect your property, but builds the documentation and trust insurers rely on when approving future claims.
When Water Damage Turns into a Flood Claim: Understanding the Difference
It’s not just about how much water there is, but where it came from that determines coverage. In insurance terms, water damage typically refers to incidents that originate inside the property, such as burst pipes, appliance failures, or roof leaks.
Flood damage, on the other hand, occurs when water from an external source, like heavy rain, storm surge, or rising groundwater, enters the property and causes destruction.
This distinction matters because standard homeowners’ insurance usually does not cover flooding. Instead, those losses fall under a separate flood insurance policy, often provided through FEMA’s National Flood Insurance Program or private flood coverage.
Mitigation experts can play a key role in identifying which type of damage applies. By assessing the origin of the water and properly documenting findings, they help homeowners avoid claim misclassification and ensure the right insurance process is followed.
To learn more about managing flood-related damages and supplements, check out our guide regarding Flood Claim Supplements.
How Claim Supplement Pro Helps Streamline the Water Damage Claim Process
Navigating the water damage insurance claim process can quickly turn into a maze of forms, photos, and follow-ups. That’s why Claim Supplement Pro steps in to help mitigation specialists simplify every stage and make sure no legitimate repair goes unpaid. Our experts review estimates, identify missed line items, prepare supplements, and communicate directly with carriers to achieve fair settlements.
This is how we make the process less stressful and more efficient for you:
- Estimating – Accurate, Xactimate-based estimates that reflect the real cost of mitigation and restoration.
- Supplement Preparation – Thorough line-item review and documentation to recover funds missed in the initial insurance estimate.
- Negotiation Support – Expert communication with adjusters to resolve discrepancies and secure appropriate payouts.
- Documentation Training for Teams – Helping restoration professionals improve photo documentation, drying logs, and scope accuracy for future claims.
Let yourself breathe and focus on the mitigation work while we handle the claim complexity, either through our estimating services or water mitigation and flood supplements.
Turning the Tide on Water Damage Claims
Just like water sustains life, understanding the water damage claim process sustains your property and your projects. Knowing each step of the claims process ensures you’re not left paying out-of-pocket or chasing delayed payouts.
Partnering with Claim Supplement Pro helps you navigate inspections, documentation, supplements, and negotiations, turning what could be a stressful flood of paperwork into a smooth, fully funded restoration.
Stay ahead of the current. Contact Claim Supplement Pro and make sure your glass is just full enough.